


Pairing a wireless microphone can seem like a daunting task, especially if you're new to the world of audio equipment. However, with the right guidance and a bit of patience, you can quickly get your wireless microphone up and running. As a supplier of high - quality wireless microphones, I'm here to share a comprehensive guide on how to pair a wireless microphone, ensuring that you have a seamless audio experience.
Understanding the Basics of Wireless Microphones
Before we dive into the pairing process, it's essential to understand the basic components of a wireless microphone system. A typical wireless microphone setup consists of two main parts: the transmitter and the receiver. The transmitter is the handheld or lavalier microphone that captures the audio, while the receiver is connected to the audio output device, such as a sound system or a recording device.
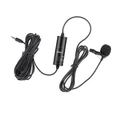
There are different types of wireless microphones available in the market. For instance, you can check out our Wireless Microphone Of Metal, which offers durability and excellent sound quality. Another popular option is our One Drag Two Wireless Microphones, which allows you to use two microphones simultaneously with a single receiver. You can also explore our full range of Wireless Microphone products to find the one that suits your needs best.
Pre - pairing Preparations
1. Check the Battery
The first step in the pairing process is to ensure that both the transmitter and the receiver have sufficient power. Most wireless microphones use rechargeable batteries or standard AA/AAA batteries. Check the battery level indicator on the devices. If the batteries are low, recharge or replace them before proceeding. A low - battery situation can cause interference and prevent proper pairing.
2. Choose the Right Frequency
Wireless microphones operate on specific frequencies. In many countries, certain frequency bands are allocated for wireless audio devices. It's crucial to select a frequency that is legal and not being used by other nearby devices. Some wireless microphone systems come with an auto - scan function that can help you find an available frequency. On the other hand, more advanced systems allow you to manually select a frequency within the allowed range.


3. Positioning
Proper positioning of the transmitter and receiver is vital for a strong and stable signal. Keep the transmitter and receiver within the recommended distance specified in the user manual. Obstacles such as walls, metal objects, and large electronic devices can interfere with the wireless signal. Try to place the receiver in an open area, away from potential sources of interference. If you're using a handheld transmitter, hold it correctly to avoid blocking the antenna.
Pairing Process for Different Types of Wireless Microphones
1. Automatic Pairing
Many modern wireless microphones support automatic pairing. Here's how it usually works:
- Turn on the receiver first. Wait for it to boot up and enter the pairing mode. This is often indicated by a blinking light on the receiver.
- Then, turn on the transmitter. The transmitter will automatically search for the receiver and attempt to pair. Once the pairing is successful, the lights on both the transmitter and the receiver will stop blinking and stay steady.
- Some systems may require you to press a specific button on the transmitter or receiver to initiate the automatic pairing process. Refer to the user manual for your specific model.
2. Manual Pairing
If your wireless microphone does not support automatic pairing, you'll need to perform a manual pairing.
- First, set the frequency on the receiver. Use the frequency adjustment buttons or the menu on the receiver to select the desired frequency.
- Next, set the same frequency on the transmitter. Make sure to match the frequency settings exactly on both devices.
- After setting the frequencies, turn on both the transmitter and the receiver. They should now be paired and able to communicate with each other. You may need to adjust the volume levels on both the transmitter and the receiver to get the desired audio output.
Troubleshooting Pairing Issues
Even if you follow all the steps correctly, you may encounter some pairing issues. Here are some common problems and their solutions:
1. No Signal
- Check the Batteries: As mentioned earlier, low batteries can cause a loss of signal. Replace or recharge the batteries if necessary.
- Check the Antennas: Ensure that the antennas on both the transmitter and the receiver are properly extended and not damaged. A damaged or retracted antenna can weaken the signal.
- Check the Frequency: Make sure that both the transmitter and the receiver are set to the same frequency. If the frequency has been accidentally changed, reset it to the correct value.
2. Interference
- Change the Frequency: If you're experiencing interference, try changing the frequency to a different channel. Use the auto - scan function if available to find an open frequency.
- Move the Devices: Relocate the transmitter and receiver to a different position. Try to move them away from sources of interference such as Wi - Fi routers, microwave ovens, and other electronic devices.
3. Audio Quality Issues
- Adjust the Gain: The gain controls on the transmitter and receiver determine the volume level of the audio. If the audio is too loud or too soft, adjust the gain settings accordingly.
- Check the Audio Cable: If the receiver is connected to an audio output device via a cable, make sure the cable is properly plugged in and not damaged.
Testing the Paired Wireless Microphone
After pairing, it's important to test the wireless microphone to ensure that it's working correctly.
- Speak or make some noise into the microphone. Check the audio output on the connected device, such as a speaker or a recording device.
- Walk around the area where you'll be using the microphone to test the signal strength. Make sure there are no drop - outs or interference as you move.
- If possible, record a short audio clip and listen to it to check for any audio quality issues.
Conclusion
Pairing a wireless microphone may seem complex at first, but by following the steps outlined in this guide, you can easily get your wireless microphone up and running. Whether you're using it for a presentation, a live performance, or a recording session, a properly paired wireless microphone will provide you with clear and reliable audio.
If you're in the market for a high - quality wireless microphone, we have a wide range of products to meet your needs. Our Wireless Microphone Of Metal, One Drag Two Wireless Microphones, and other Wireless Microphone options are designed with the latest technology and offer excellent performance.
If you have any questions about our products or need further assistance with pairing, please feel free to contact us for a purchase consultation. We're here to help you find the perfect wireless microphone solution for your requirements.
References
- Manufacturer's user manuals for wireless microphones
- Industry standards and regulations for wireless audio devices
- Audio engineering textbooks and online resources on wireless communication